Geometry Source

The FumeFX Geometry Source lets the user build any geometry within their scene to be used as a component within their FumeFX simulation. In many cases, the objects selected within the Geometry Source gizmo are going to be the ignition source of the fire and smoke. Other times, they will be used to affect other fuel sources within the simulation. Geometry Source also allows use of FumeFX Particles (accessible through NodeWorks) as well as tyFlow and Particle Flow particle systems and supports their particle shape geometry for emission.
To create an Geometry Source, go to the Create Command Panel, and from the Helpers menu, select FumeFX -> Object Src. Then click and drag in any 3ds Max viewport to create this Source. When done, you will be presented with a number of options, including which geometric object to use as part of the FumeFX simulation.
This rollout contains the basic parameters for your Geometry Source. As mentioned before, all of its controls are available in both the Create/Modify Command Panel (by selecting the Geometry Source gizmo), as well as within the FumeFX UI floating dialog.
Active - You can turn this source on/off using this checkbox. You can also animate this checkbox.
Objects/Particles - List of objects and particles that will be used as geometry sources. Particles what doesn`t have any shape will not be used as geometry source.
Pick / Remove - When you create a FumeFX Geometry Source, the first thing you want to do is select the geometry that will become part of the simulation. Click on the Pick icon to choose an object, tyFlow or Particle Flow event. This basically links the geometry to the source icon, which will provide all of the parameters for the simulation.
ffxParticles Group Regex - If you pick FumeFX NodeWorks as a particle source, you will need to type particle group name(s) that will be used as sources.
Note: If you have objects that are grouped together in 3ds Max, when you use the Pick button it will select only one sub-component object from the group.
Parameters

Icon Size - Use this to modify the size of the icon - the Geometry Source`s symbolic representation in the viewport.
Map Channel - Select the mapping channel that will be used for textures used as masks.
Use Selection - Enable this option if you want to emit only from selected faces.
Use Material ID - If enabled, only faces that have user defined Material ID will be used as a source.
Material ID - Face material ID.
Use Vel Chan - Some geometry objects can have per vertex velocities saved in different mapping channels. For example tyflow`s tyMesher will save vertex velocities to the mapping channel 20 by default. Geom Source can retrieve data stored to that mapping channel and use to add velocities to the simulation.
Vel Chan - Chose mapping channel that contains velocities.
Free Flow - If you check this, source parameters will still influence channel values, but the source, itself, will behave just like fluid. As a result, the source`s velocity will not interrupt fluid movement in any way.
Type - The type chosen affects how the source volume is treated:
- Volume fills the entire volume of the object.
- Shell fills only the surface of the object.
- Solid fills only the surface of the object; the interior is interpreted as a solid object, so nothing can pass through it.
Fuel, Oxygen, Temperature, Smoke and Color

Each of these channels has same set of parameters. These parameters work as a kind of mixing board, allowing you to balance and adjust the basic way in which different channels will affect your FumeFX simulation.
Type - Click the Set button to choose the type of affect that the source will have on that channel. When you click on it, you will get the following pop-up menu:
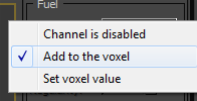
Channel is Disabled - The source won`t change that channel.
Add Values to the Voxel - The source adds values to voxel (v + value = amount).
Set Values in the Voxel - The source sets the voxel at a value (v = amount).
Amount - This is the amount that is set or added to each voxel.
Source controller - This button has a dash on it and resides next to the Amount Spinner. Go here to learn more about Source Controllers.
Map - With this option, you can use a procedural 3D texture map as a mask for the value that is set. Click the Disabled button to enable/disable, or to choose Source from Red Channel, Source from Blue Channel, Source from Green Channel, or Source from Intensity as shown below. Once active, the map slot below this button will become active and ready for the user to select the map.

Pressure
Use this option to add pressure to the simulation. It works the best when source is set to Free Flow.
Velocity
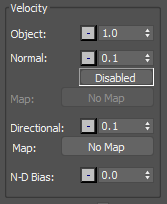
Object - Use the spinner to select a multiplier value for the object movement.
Normal - This is the velocity multiplier in the object`s face normal direction. It is possible to use a map to modulate the velocity`s value.
Map - Map allows users to use a procedural 3D texture map as a mask for the normal component of the emitted velocity. Click the Disabled button to enable/disable, or to choose Source from Red Channel, Source from Blue Channel, Source from Green Channel, or Source from Intensity as shown below. Once active, the map slot below this button will become active and ready for the user to select the map.

Source Controller - To the right of the Velocity spinners is a button with a dash on it. This is where you can access the Source Controller options for the velocity parameters. Go here to learn more about Source Controllers.
Directional - The velocity calculated from the colors painted on the object by using the FFXVertexPaint modifier. This modifier allows user to paint velocities (stored in vertex colors) by using the brushes strokes.
Map - Map uses a Vertex Color channel for the directional component of the emitted velocity. Red represents X direction, Green Y direction and Blue Z direction.
N-D Bias - This parameter defines the bias value between Normal velocity and Directional velocity. Value of 0 means that the contribution from Normal velocity will be 1.0 and contribution from Directional velocity will be 0.
Note: Velocity parameters cannot have negative values.
Custom Direction

Custom Direction - Enable this option if you wish to add velocities in a custom direction. Custom direction is in world coordinate system.
X Direction - Velocity along the X axis direction.
Y Direction - Velocity along the Y axis direction.
Z Direction - Velocity along the Z axis direction.
Map - Use this map to add custom direction velocity variation.
Turbulence
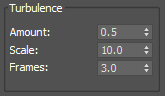
Use these parameters to add irregularities to all source added values.
Amount - This sets the overall amount of irregularities on a scale from 0-1.
Scale - This value defines noise scale.
Frames - This value sets the speed of change per amount of Frames.